使用Hexo搭建博客
前置准备
系统环境:Win11
安装 Node.js
验证安装结果:
1 | node -v |
配置国内镜像加速:
1 | npm config set registry https://registry.npmmirror.com |
安装Git
安装hexo
安装hexo:
1 | npm i hexo-cli -g |
查看安装结果:
1 | hexo -v |
升级Hexo:Hexo版本升级指南 | novnan’s notes
初始化博客目录
在某个空文件夹下运行 hexo init 命令,将该文件夹初始化,我这里使用 blog-site 目录
1 | PS C:\Users\Peng\Desktop\blog-site> hexo init |
有几个warning,不用管
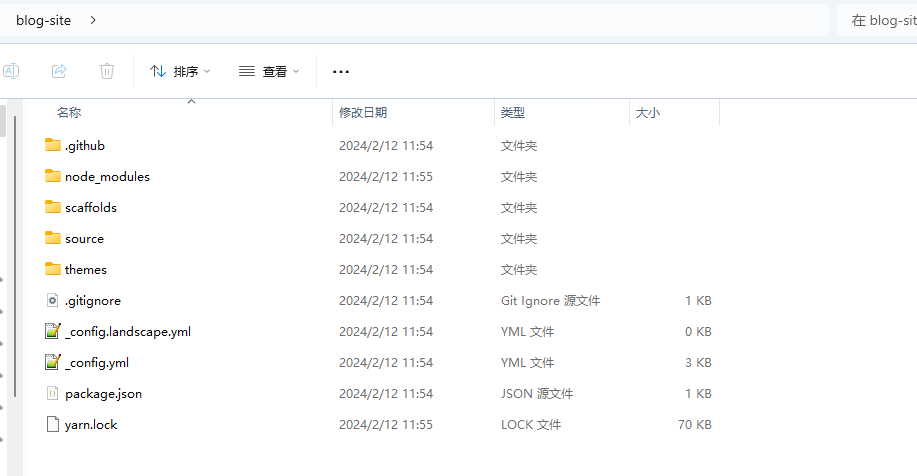
初始化后,在空目录下创建了如下文件:
初始化时 node.js 证书过期问题
使用
hexo init命令初始化:
2
3
4
5
6
7
8
9
INFO Cloning hexo-starter https://github.com/hexojs/hexo-starter.git
INFO Install dependencies
error Error: certificate has expired
at TLSSocket.onConnectSecure (node:_tls_wrap:1674:34)
at TLSSocket.emit (node:events:518:28)
at TLSSocket._finishInit (node:_tls_wrap:1085:8)
at ssl.onhandshakedone (node:_tls_wrap:871:12)
WARN Failed to install dependencies. Please run 'npm install' in "C:\Users\Peng\Desktop\blog-site" folder.输出显示node相关的证书过期,此时下方提示您使用
npm install,当然也可以使用yarn当我们运行
yarn命令,依然会提示证书过期的问题
2
3
4
5
6
7
8
9
10
yarn install v1.22.21
info No lockfile found.
[1/4] Resolving packages...
error Error: certificate has expired
at TLSSocket.onConnectSecure (node:_tls_wrap:1674:34)
at TLSSocket.emit (node:events:518:28)
at TLSSocket._finishInit (node:_tls_wrap:1085:8)
at ssl.onhandshakedone (node:_tls_wrap:871:12)
info Visit https://yarnpkg.com/en/docs/cli/install for documentation about this command.解决方案
查看yarn配置,可见strict-ssl的值为true,意味着需要使用到CA证书
2
3
4
5
6
7
8
9
10
11
12
13
14
15
16
17
18
19
20
21
22
23
24
25
yarn config v1.22.21
info yarn config
{
'version-tag-prefix': 'v',
'version-git-tag': true,
'version-commit-hooks': true,
'version-git-sign': false,
'version-git-message': 'v%s',
'init-version': '1.0.0',
'init-license': 'MIT',
'save-prefix': '^',
'bin-links': true,
'ignore-scripts': false,
'ignore-optional': false,
registry: 'https://registry.yarnpkg.com',
'strict-ssl': true,
'user-agent': 'yarn/1.22.21 npm/? node/v20.11.0 win32 x64',
lastUpdateCheck: 1707636739137
}
info npm config
{
registry: 'https://registry.npm.taobao.org'
}
Done in 0.03s.设置禁用ssl:
2
3
4
5
yarn config v1.22.21
success Set "strict-ssl" to "false".
Done in 0.03s.
PS C:\Users\Peng\Desktop\blog-site>设置完后,再使用
yarn命令安装依赖:
2
3
4
5
6
7
8
9
10
11
12
13
yarn install v1.22.21
info No lockfile found.
[1/4] Resolving packages...
warning hexo > warehouse > cuid@2.1.8: Cuid and other k-sortable and non-cryptographic ids (Ulid, ObjectId, KSUID, all UUIDs) are all insecure. Use @paralleldrive/cuid2 instead.
warning hexo-renderer-marked > jsdom > domexception@4.0.0: Use your platform's native DOMException instead
warning hexo-renderer-marked > jsdom > abab@2.0.6: Use your platform's native atob() and btoa() methods instead
warning hexo-renderer-marked > jsdom > data-urls > abab@2.0.6: Use your platform's native atob() and btoa() methods instead
[2/4] Fetching packages...
[3/4] Linking dependencies...
[4/4] Building fresh packages...
success Saved lockfile.
Done in 10.64s.
本地预览网站
初始化之后,就创建了一个博客完整项目,使用hexo g命令编译项目,编译完成后使用hexo s开启本地服务:
或者直接使用
hexo s -g命令
1 | PS C:\Users\Peng\Desktop\blog-site> hexo g |
输出显示,访问:http://localhost:4000/
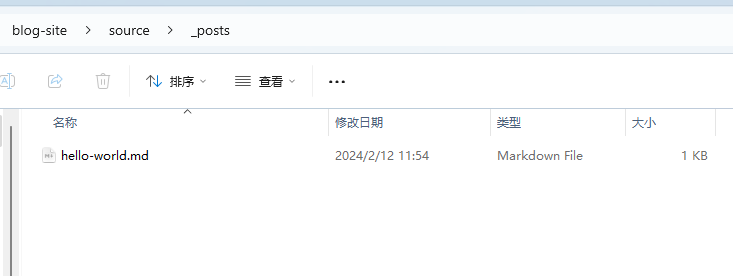
访问可以看到一篇名为Hello World的默认文章:
文章保存在目录下的
\source\_posts目录中
编写新文章
文章中可能需要添加图片,那么还需要额外配置
更改根目录下的config.yaml文件中的配置:
1 | post_asset_folder: true |
当该配置被应用后,使用hexo new命令创建新文章时,会生成相同名字的文件夹,也就是文章资源文件夹。


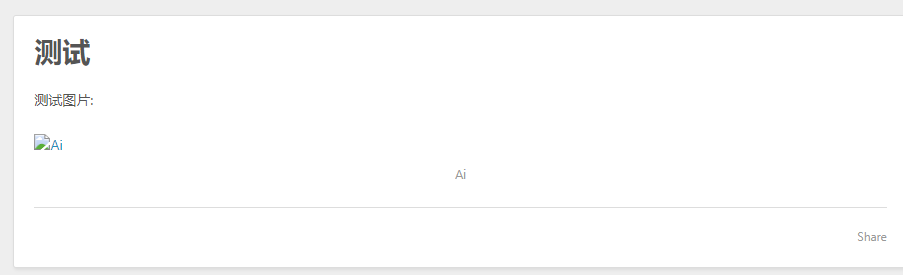
在typro中打开,显示如下:

hexo预览效果:
解决方案,添加插件: https://github.com/CodeFalling/hexo-asset-image
1 | PS C:\Users\Peng\Desktop\blog-site> yarn add https://github.com/CodeFalling/hexo-asset-image |
添加完插件后,依次使用hexo clean, hexo g , hexo s命令重新生成本地预览,预览效果如下:

修改文章
可直接修改文章,并运行hexo clean, hexo g命令重新生成
修改文章的访问路径
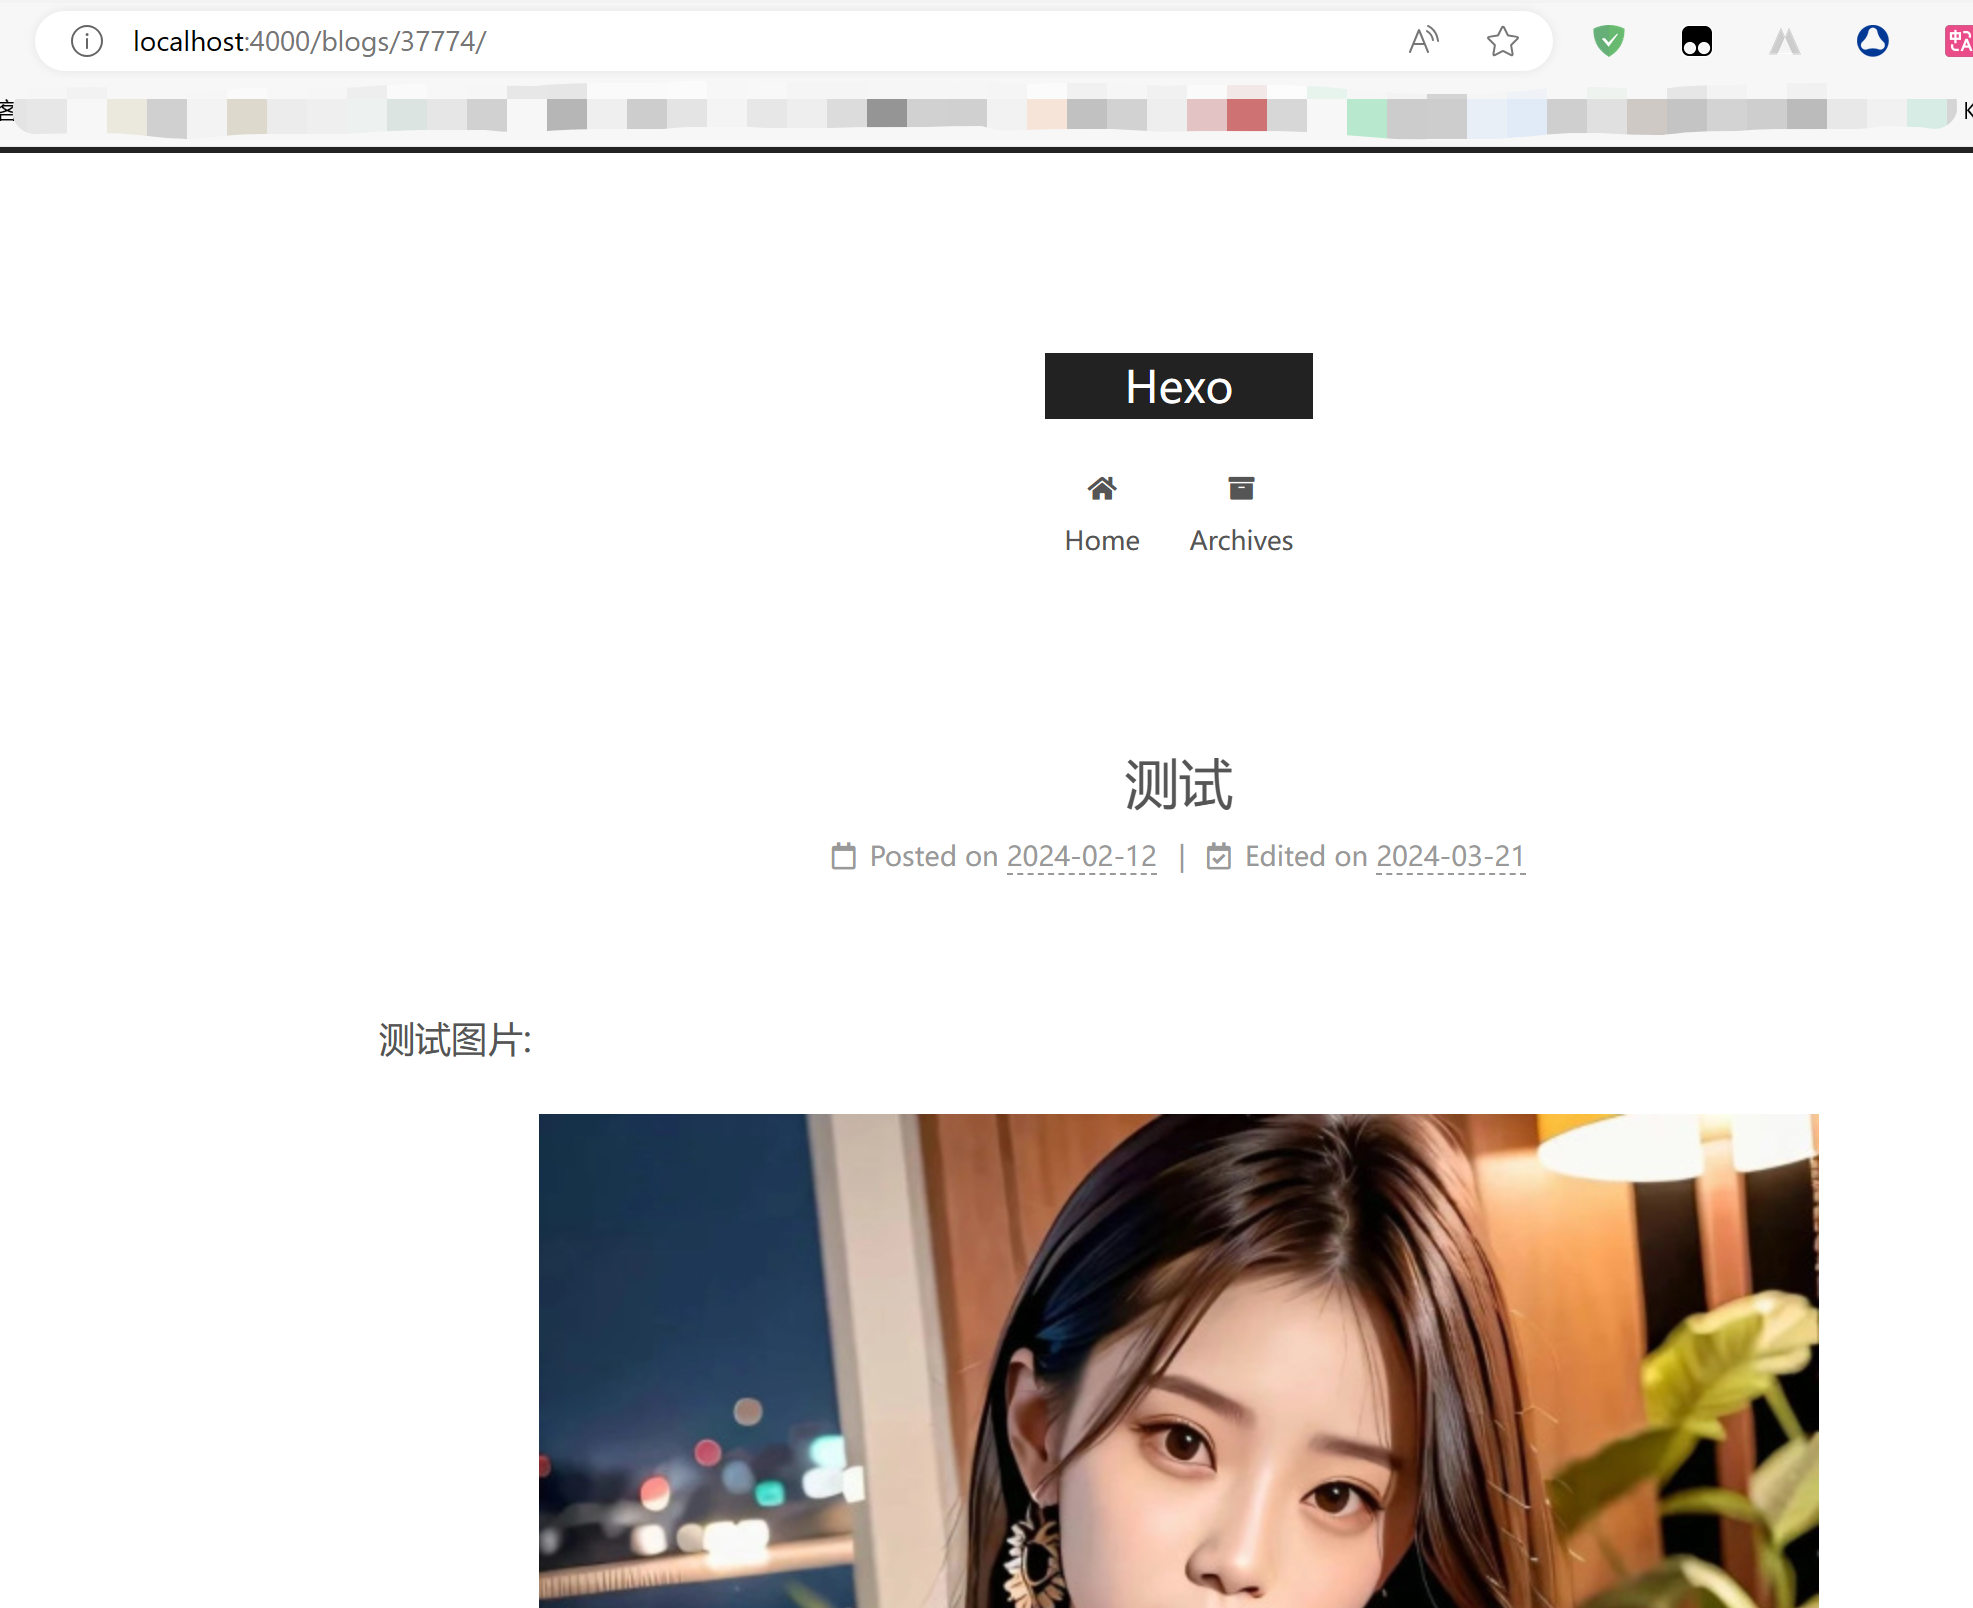
文章的默认访问路径是日期+文章名:/2024/02/12/测试/
修改为类似根据文章id的形式访问:blogs/1234
实现方式
修改_config文件中permalink的值
1 | permalink: blogs/:abbrlink/ |
在hexo博客的主目录下安装hexo-abbrlink
1 | yarn add hexo-abbrlink --save |
这样,使用hexo g重新生成的博客,将会添加abbrlink属性
如果发生图片访问不到的情况,请使用
hexo clean命令清除一下环境

文章的访问路径也改变了:
将博客托管到GitHub
新建GitHub仓库
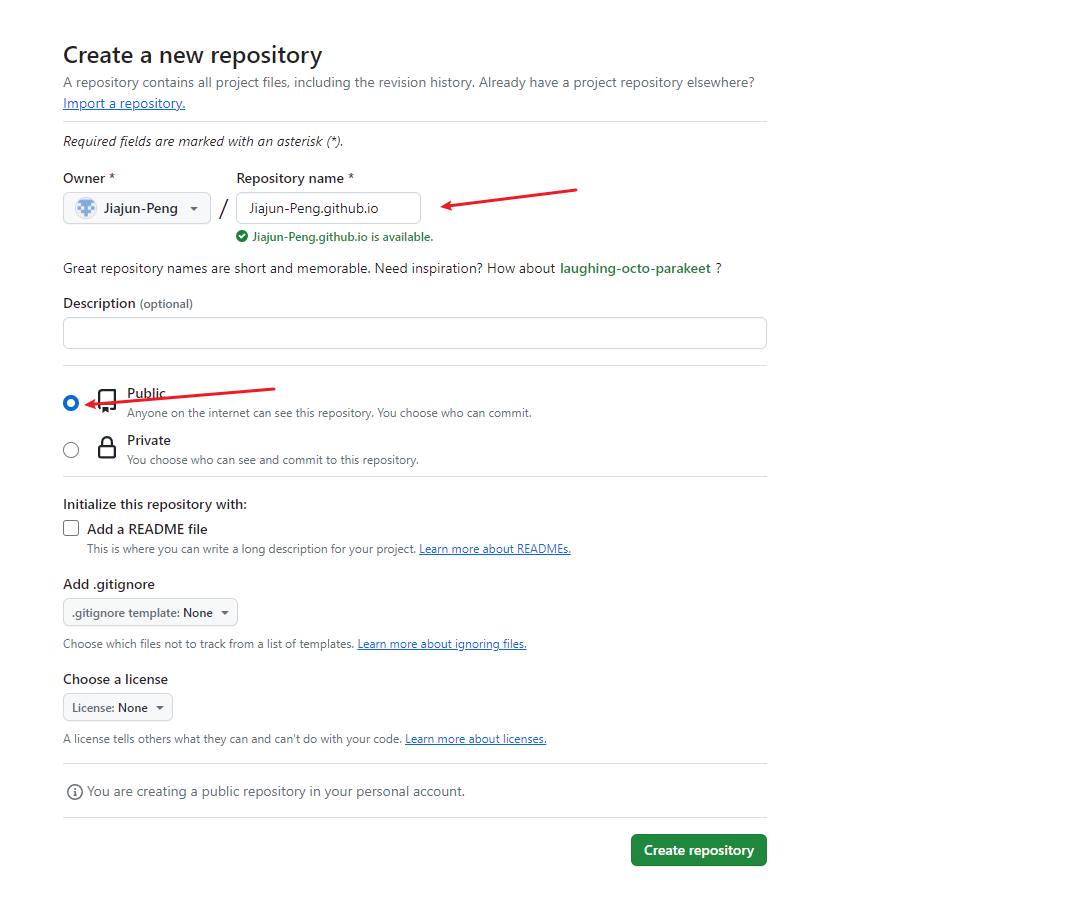
需要自己先注册GitHub账号
注册完账号后,创建一个新仓库,仓库的名字需要满足以下格式:
账户名+.github.io
比如我的github账户名为:Jiajun-Peng,那么我创建的新仓库名为:Jiajun-Peng.github.io
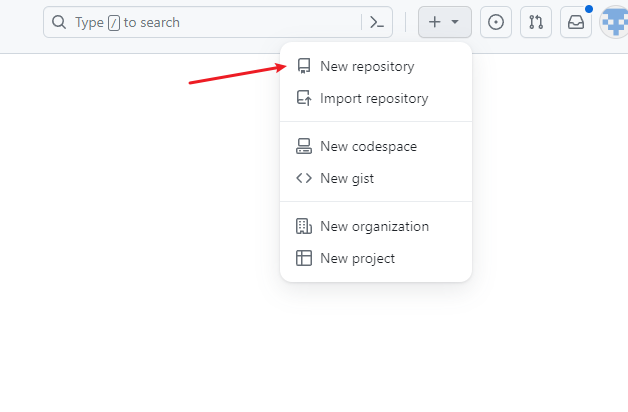
具体的创建步骤如下:

关联本地博客到GitHub并发布
目前,我的GitHub仓库的地址是:https://github.com/Jiajun-Peng/Jiajun-Peng.github.io.git
修改博客根目录中的_config.yml文件,并修改deploy位置的配置,配置如下:
1 | deploy: |
在发布到远程仓库之前,还需安装hexo-deployer-git插件,命令:
yarn add hexo-deployer-git
1 | PS C:\Users\Peng\Desktop\blog-site> yarn add hexo-deployer-git |
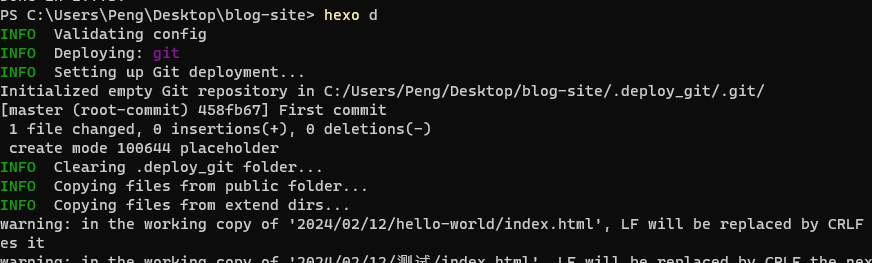
安装完成后,使用hexo d命令即可发布到GitHub.
发布成功后,可以在Github网站页面看到:

在Settings -> Pages页即可以看到博客的访问地址:
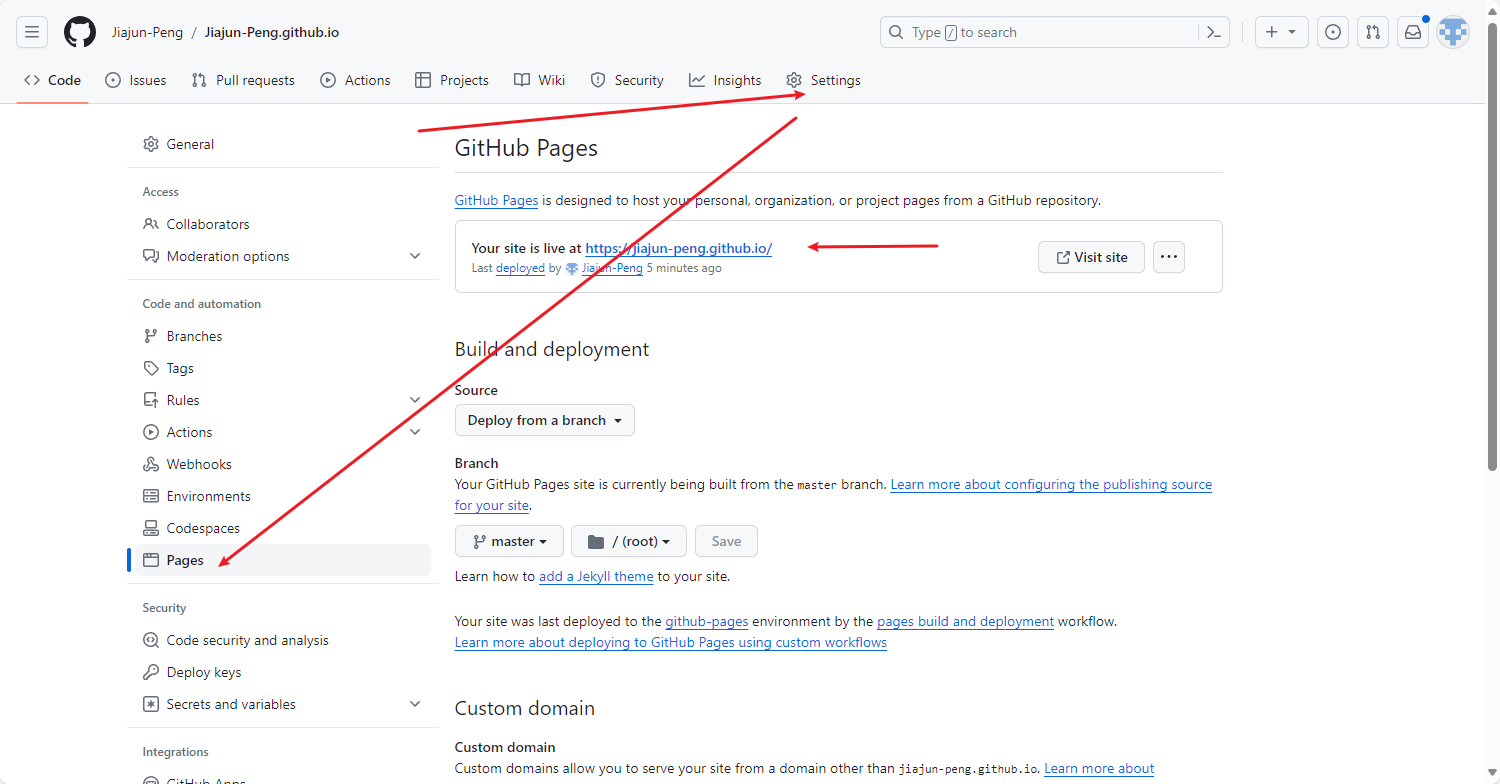
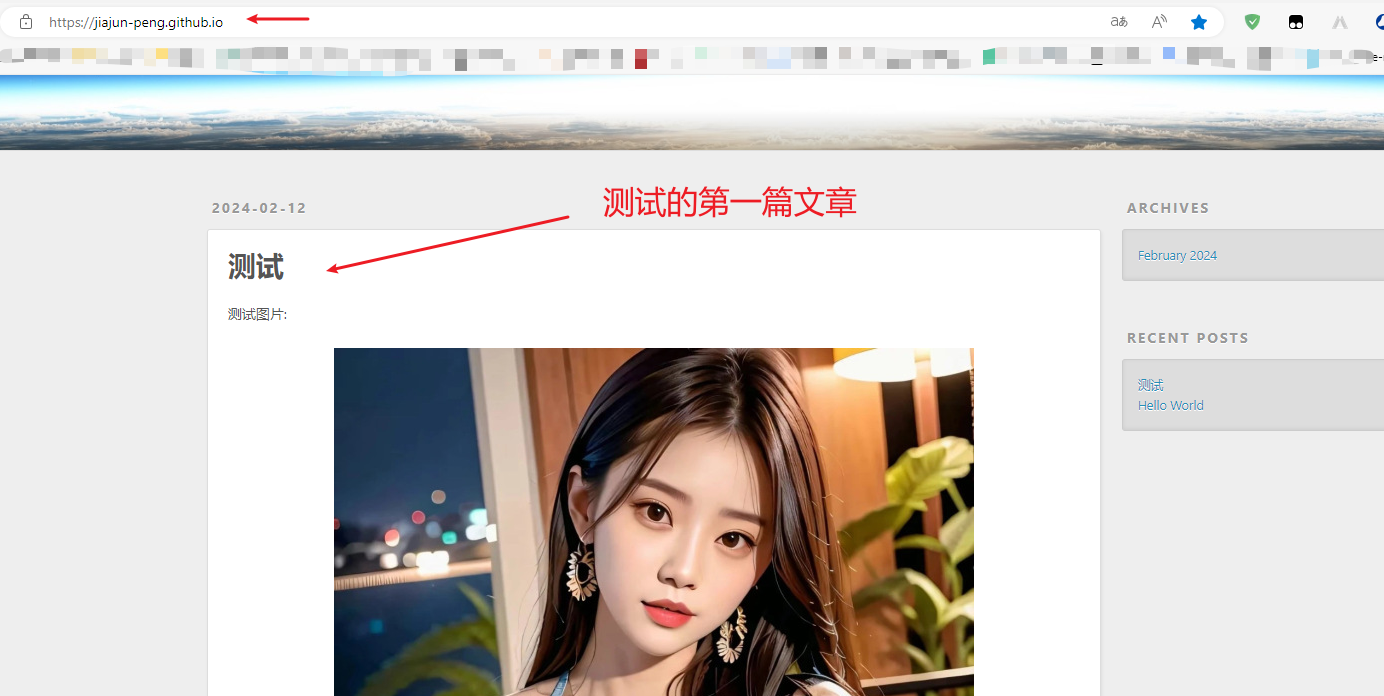
访问https://jiajun-peng.github.io/,可以看到我们的第一篇测试文章
配置域名访问
比如我有一个名为nobug.world的域名,我希望使用这个域名访问博客,那么可以将域名的解析到github的地址

增加两条解析记录:

并在github上配置自定义域名:
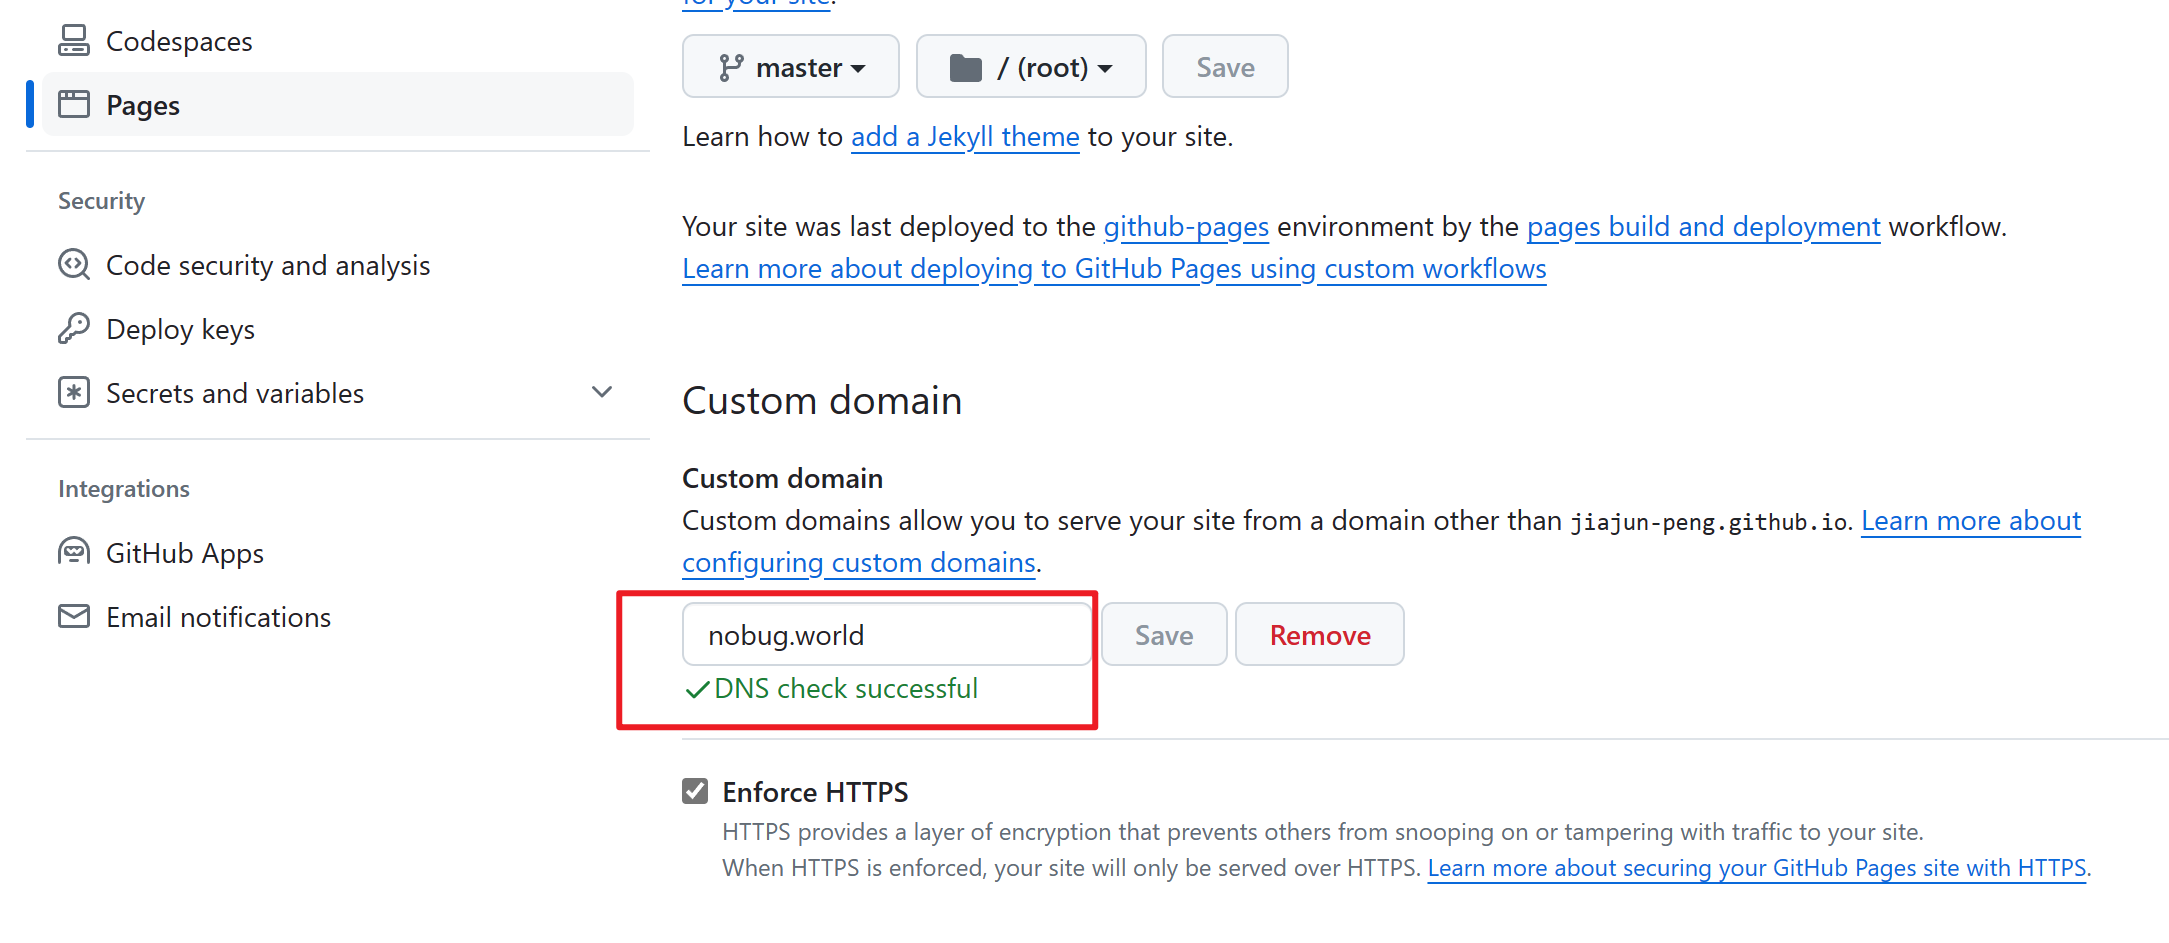
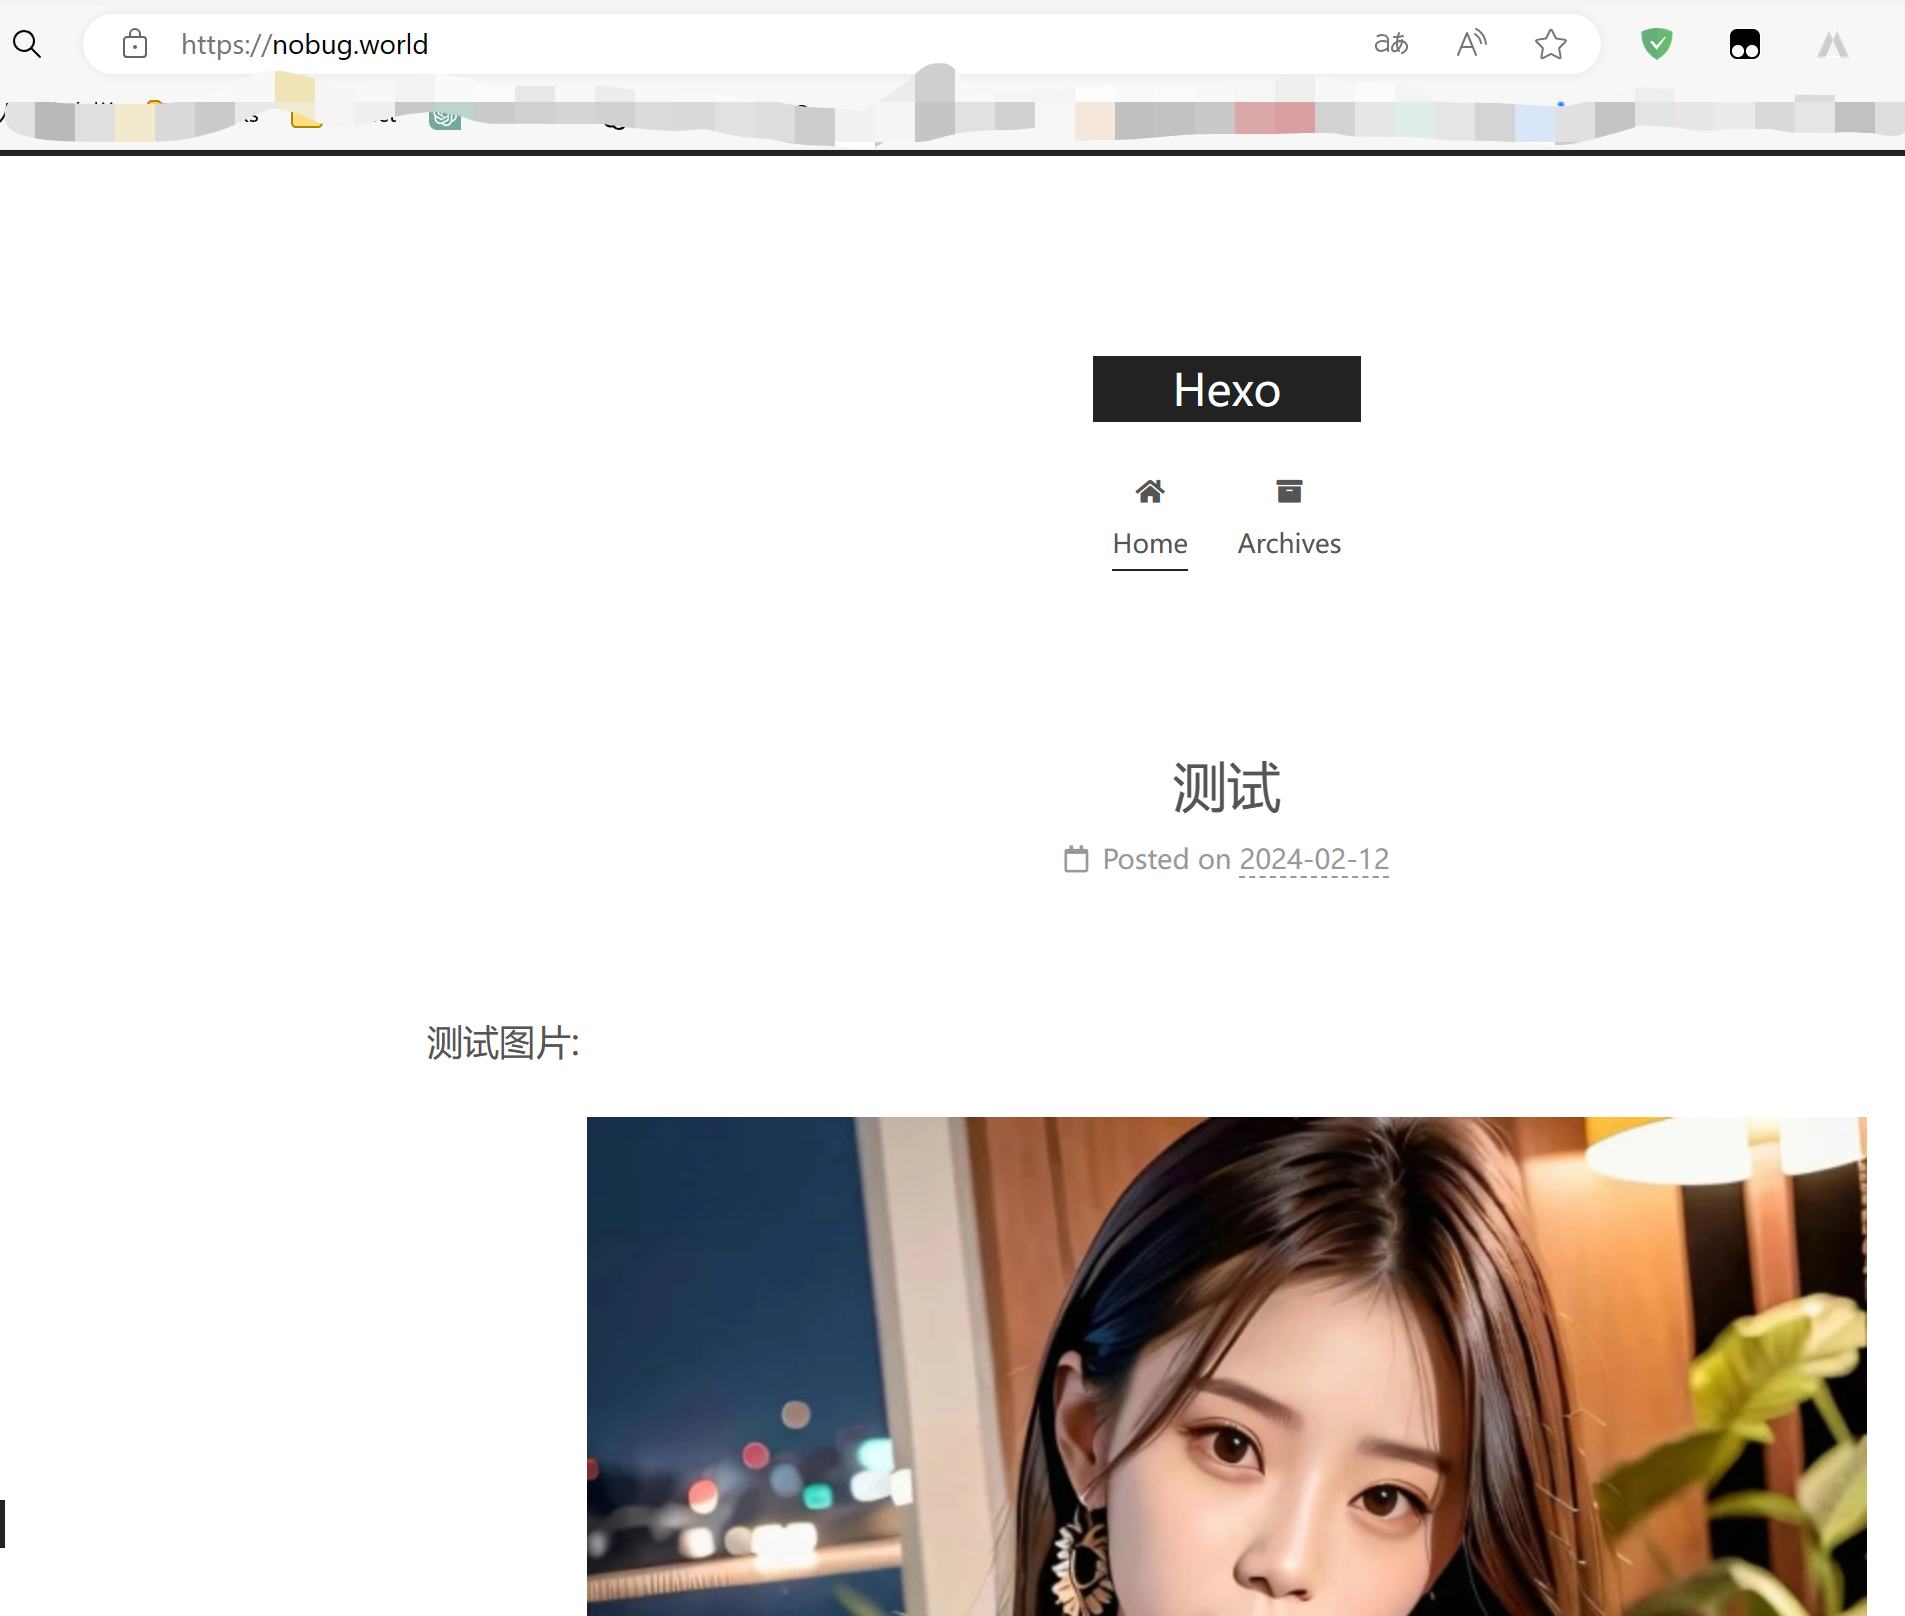
接着,就可以使用域名访问博客了
解决 Hexo 部署 Github Pages 自定义域名失效的问题
参考:解决 Hexo 部署 Github Pages 自定义域名失效的问题(即使已添加 CNAME)_gitpages cname值在哪里找到-CSDN博客
无法访问 github 仓库的问题
可以在浏览器中访问github(使用vpn),但无法在控制台使用git clone命令来克隆github中的仓库到本地:
1 | Failed to connect to github.com port 443 |
解决方案
windows系统中打开设置–网络–代理
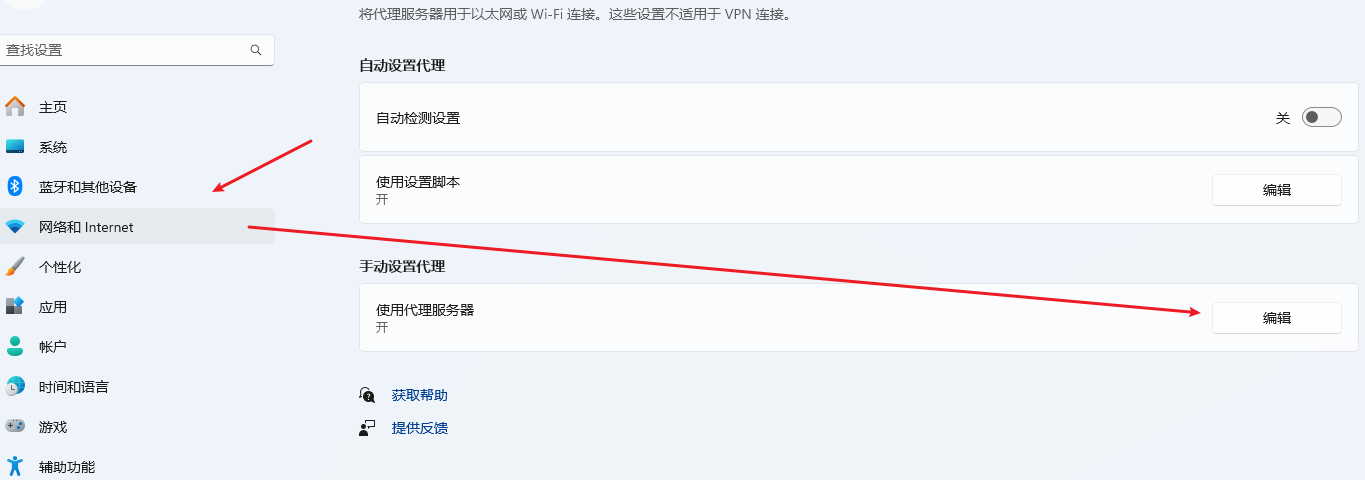
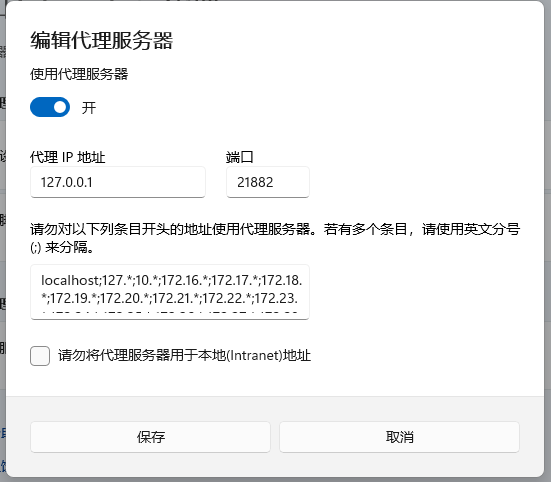
打开代理服务器,并为git设置该代理服务器
查看git配置:
1 | $ git config --list |
设置git代理服务器:
1 | $ git config --global http.proxy 127.0.0.1:21882 |
设置完之后,就可以使用git clone来克隆github中的仓库了
如果需要取消使用代理,可以使用如下命令:
配置主题
NexT - Theme for Hexo (theme-next.js.org)
更换 Hexo 主题非常容易,只要在 根目录下的themes 文件夹内,新增与主题名称同名的文件夹(用于存放主题文件),并修改 Hexo 目录下 _config.yml 文件内的 theme 设置,即可切换主题。
这里选用Next作为新主题.
切换主题的步骤是,下载主题文件,并将文件放到 themes 文件夹中,下载主题文件的方式即可以从待选用主题的官网下载也可以去github上将该主题clone下来.
Next的Github仓库:next-theme/hexo-theme-next: 🎉 Elegant and powerful theme for Hexo. (github.com)
这里使用clone的方式下载主题,切换路径到博客的根目录,再clone:
1 | git clone https://github.com/next-theme/hexo-theme-next themes/next |
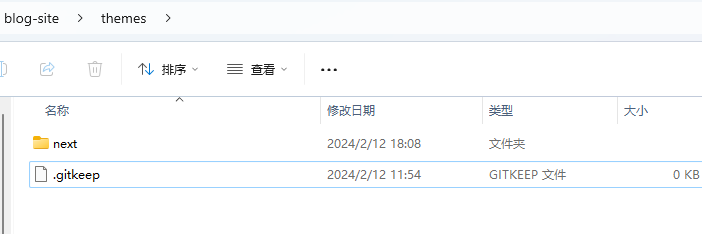
下载完成后,themes目录下多了一个名为next的目录,其中保存了主题的相关文件:
修改配置:

重新生成预览后:

修改主题 Scheme
1 | # --------------------------------------------------------------- |
修改主题语言
默认语言是英文,如果需要修改的话,先在主题的 themes\next\languages 目录下查看支持的语言有哪些。
中文一般有 zh- 前缀:
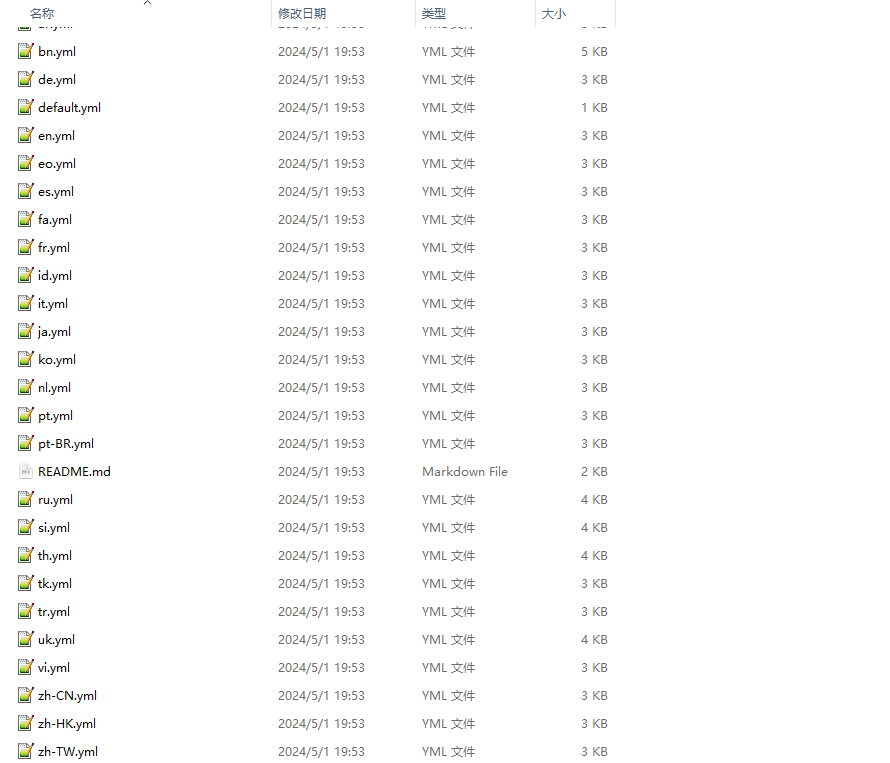
zh是“中文”(Chinese)的 ISO 639-1 语言代码,它是一个国际标准,用于识别不同的语言。-后面的部分通常用来指定特定的地区或者方言变种。例如:
zh-CN表示简体中文(中国大陆使用的中文)。zh-TW表示繁体中文(台湾地区使用的中文)。zh-HK表示繁体中文(香港特别行政区使用的中文)。zh-SG表示简体中文(新加坡使用的中文)。
这里我们选择 zh-CN ,那么修改 hexo 博客根目录下 _config.yml 文件中的配置项:
1 | language: zh-CN |
首页文章折叠-reade more
next 主题默认在首页展示每篇文章的全文,但是一般我们希望仅展示部分内容,并提供阅读全文 或者 Read more 的按钮,样式如下:
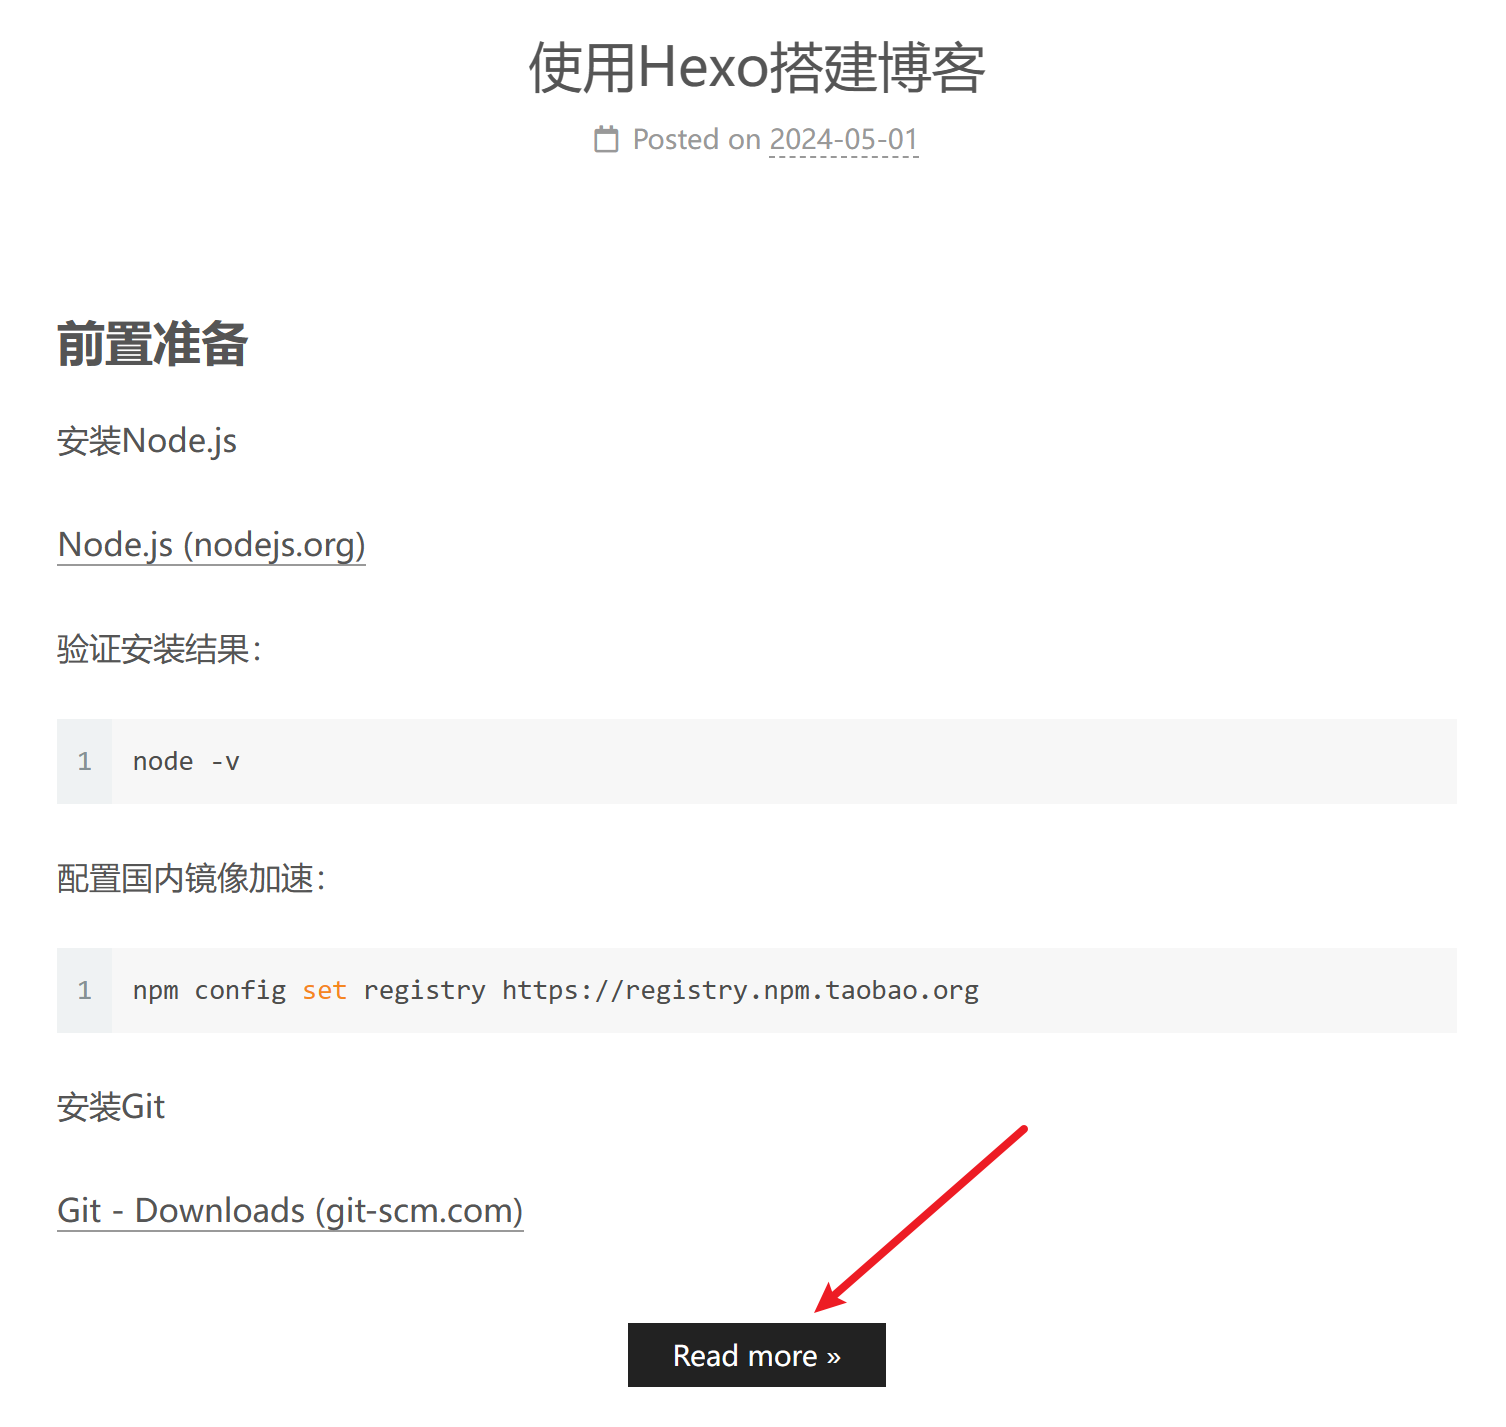
设置Read more
我采用的方案是在文章需要隐藏的内容之前添加<!--more-->。
参考:请问如何设置read more? · Issue #62 · iissnan/hexo-theme-next (github.com)
设置Read more的跳转锚点
默认情况下,点击Read more是跳转到文章详情中设置 <!--more--> 的位置,但我个人希望跳转到文章的起始位置。
老版本中可以在主题的config文件中将scroll_to_more 选项设置false实现。
我使用的版本则需要修改,代码源文件,修改的文件是:\themes\next\layout\_macro\post.njk
有些版本中不是post.njk文件,对应的则是修改
\themes\next\layout_macro\post.swig
将:
1 | <a class="btn" href="{{ url_for(post.path) }}#more" rel="contents"> |
修改为:
1 | <a class="btn" href="{{ url_for(post.path) }}" rel="contents"> |
即删掉#more
添加Waline评论
添加评论组件
参考:
Waline 评论系统的介绍与基础配置 | 荷戟独彷徨 (guanqr.com)
Hexo 使用 Waline 评论系统(Hexo Next 主题版本 (V8+) 的那些事) | Y.a.F.e.Y Blog (hyf.js.org)
Hexo博客进阶:为 Next 主题添加 Waline 评论系统_waline/hexo-next-CSDN博客
Hexo使用Waline评论系统 - 知乎 (zhihu.com)
注意点:
如果使用Next主题的话需要确保版本是8.0+
拉取评论时可能报401 Unauthorized异常,原因是waline的serverURL没有正确设置,不要设置为中间有一段随机英文字符的域名
管理评论
由于 Waline 有服务端,支持评论管理。第一个账号作为管理员。
找到评论框,点击 登录 按钮,会弹出一个窗口,找到用户注册。
注册好,登录之后即可进入评论管理的后台(https://xxxx.vercel.app/ui),可以对评论进行管理。
或者 登录到 Leancloud 上的 数据库进行管理。
文章阅读进度
修改主题目录下config文件的back2top参数,如下:
1 | back2top: |
作者名
设置 hexo 目录下的 config 文件的 author 选项的值:
1 | author: Peng Jiajun |
文章目录显示
设置主题目录下的 _config.yml 文件中 toc 配置项的值:
1 | # Table of Contents in the Sidebar |
文章字数统计
使用hexo-word-counter统计文章的字数以及预期阅读时间。完成配置后,可以在每篇文章开头和页面底部显示字数和阅读时间
1 | npm install hexo-word-counter |
Hexo的_config.yml文件中添加选项:
1 | symbols_count_time: |
NexT主题的_config.yml文件中修改选项:
1 | # Post wordcount display settings |
- awl– 平均字节长度(Average Word Length)。默认为 4
CN ≈ 2EN ≈ 5RU ≈ 6
- wpm – 每分钟阅读字数(Words Per Minute)。默认为275
Slow ≈ 200Normal ≈ 275Fast ≈ 350
如果文章中大多中文,那么设置awl为2,wpm为300比较合适
文章标签和分类
Hexo Next 主题默认带有不少菜单,如关于(about)、分类(categories)、标签(tags)等,默认处于注释状态,将需要取消的菜单注释掉,然后生成相应的 page 即可。
打开主题的
_config.yml文件,找到menu相关的设置,取消掉需要的菜单项的注释。1
2
3
4
5
6
7
8
9
10
11
12
13# Usage: `Key: /link/ || icon`
# Key is the name of menu item. If the translation for this item is available, the translated text will be loaded, otherwise the Key name will be used. Key is case-sensitive.
# Value before `||` delimiter is the target link, value after `||` delimiter is the name of Font Awesome icon.
# External url should start with http:// or https://
menu:
home: / || fa fa-home
about: /about/ || fa fa-user
tags: /tags/ || fa fa-tags
categories: /categories/ || fa fa-th
archives: /archives/ || fa fa-archive
#schedule: /schedule/ || fa fa-calendar
#sitemap: /sitemap.xml || fa fa-sitemap
#commonweal: /404/ || fa fa-heartbeat重新生成部署后,可以看到新增的菜单项,但是单击,跳转页面后会报如下错误
1
2
3
Cannot GET /about/
Cannot GET /tags/
Cannot GET /categories/这是因为还需要运行如下命令新建相关 page
1
2
3
hexo new page "about"
hexo new page "tags"
hexo new page "categories"新建 page 后,会在 source 目录下新建
about、tags、categories文件夹,每个文件夹下还会创建一个index.md文件表示关于、标签页分类页面,编辑这三个MarkDown文件可以自定义这三个页面的内容.并且需要在 tags 和 categories 文件对应的 index.md 的
Front-matter中增加对应的 type 选项1
type: "tags"
1
type: "categories"
跳转到站内文章
如果有空格,需要把空格换成连字符 -
跳转到站内文章的指定锚点:
1 | <a href="{% post_path 文章文件名(不要后缀) %}#章节名">显示的文字</a> |
目前暂时没有比较好的方法实现本地跳转并同时支持博客网页跳转的方式。
md文件的本地跳转格式是:
而博客网页之间的跳转格式是:
开启文章版权声明
在主题目录下的 _config.yml 文件中的 creative_commons 配置项:
1 | # Creative Commons 4.0 International License. |
效果如下:

Follow Me
post-followme.styl
自定义侧边栏
比如在侧边栏增加赞赏码
参考:打赏按钮微信赞赏码无法识别,需要添加图片放大功能 · Issue #539 · next-theme/hexo-theme-next (github.com)
Hexo 新建文章草稿
一般情况下,我们都是使用 hexo neHw <title> 来创建文章,这种方方式会将新文章创建在 source/_posts 目录下,当 hexo d 发布时,该文章会部署到 GitHub。
这种方式的缺点是:如果我们同时编辑多篇文章,其中还有未完成的文章,也会随着 hexo d 一起部署到 GitHub,也就会被读者看到未完成的文章。
文章草稿
幸运的是,Hexo 提供 draft 草稿机制,它的原理是新文章将创建在 source/_drafts 目录下,因此 hexo g 并不会将其编译到 public 目录下,所以 hexo d 也不会将其部署到 GitHub。
本地预览草稿
如果想在本地预览文章草稿,则需要执行如下命令:
1 | hexo s -g --draft |
将草稿转正式文章
完成文章后,需要将草稿发布为正式文章,可以使用如下命令:
1 | hexo p <filename> |
其中 <filename> 为不包含 md 后缀的文章名称。此命令将文章从 source/_drafts 移动到 source/_posts 。
相反,如果需要将正式文章转为草稿,则需手动将文章从
source/_posts目录移动到source/_drafts目录。